
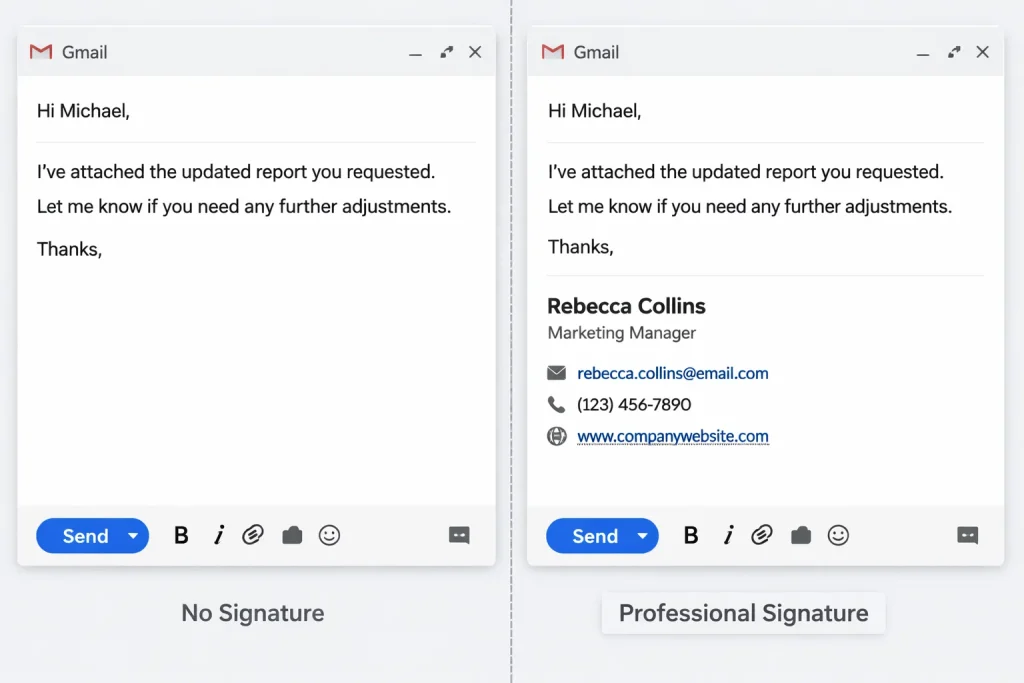
Your Gmail signature is like the closing line of every conversation you have online. It tells people who you are, what you do, and how they can reach you. Even though it looks small at the bottom of your email, it plays a big role in how professional you appear.
In 2026, email remains one of the most important tools for work, school, and business. That means your signature matters more than ever. A clear, well-crafted signature builds trust. It strengthens your personal brand and makes communication easier.
In this Blog, you will learn how to change your signature in Gmail in a clear and simple way. You will also learn how to adjust settings on your phone, improve formatting, and avoid common mistakes. Let’s get started.
Why Learning How to Change Your Gmail Signature Is Important?
Every time you send an email, your signature shows up automatically. Think about how many emails you send in a week. Now imagine each one of those emails ending without your name or contact details. That would feel incomplete.
When you understand how to change your email signature Gmail settings properly, you gain control over how people see you. A proper signature:
- Makes you look organized
- Helps people contact you quickly
- Reinforces your company name
- Builds credibility
- Saves you time
Instead of typing your phone number repeatedly, Gmail does it for you. That small automation improves your efficiency instantly.
How to Change Signature in Gmail on Desktop (Step-by-Step) 🖥️
Most people manage their Gmail on a computer. The desktop version gives you full control over formatting, images, and links.
Follow these steps carefully.
Step 1: Open Gmail Settings
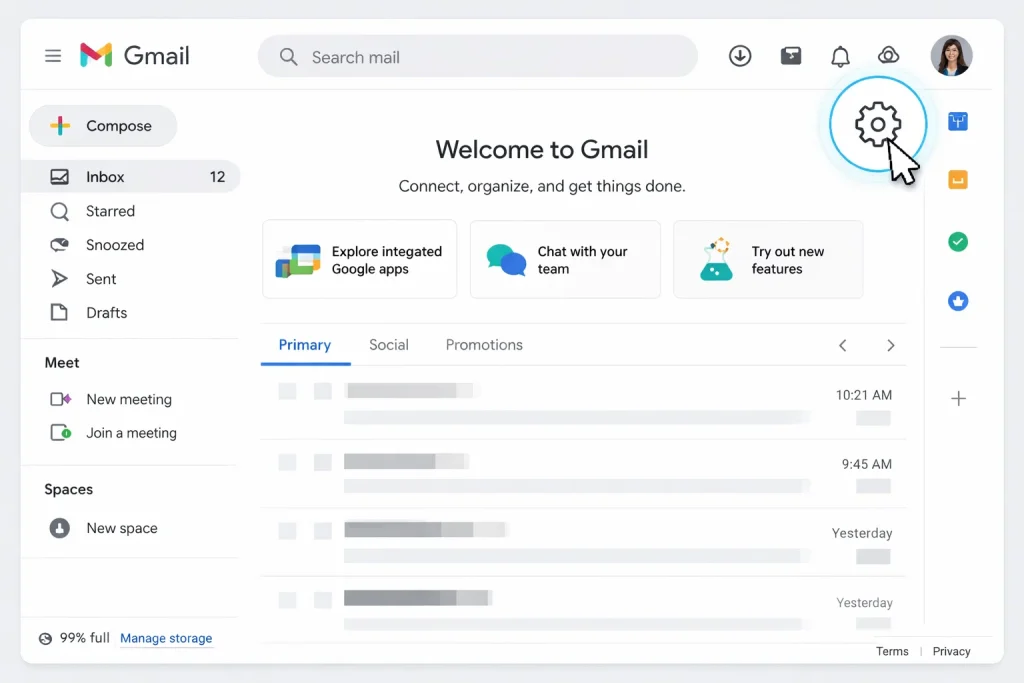
- Open Gmail in your web browser.
- Look at the top-right corner of the screen.
- Click the small gear icon.
- Select “See all settings.”
This opens the full settings panel where you can customize many features, including your signature.
Step 2: Locate the Signature Section
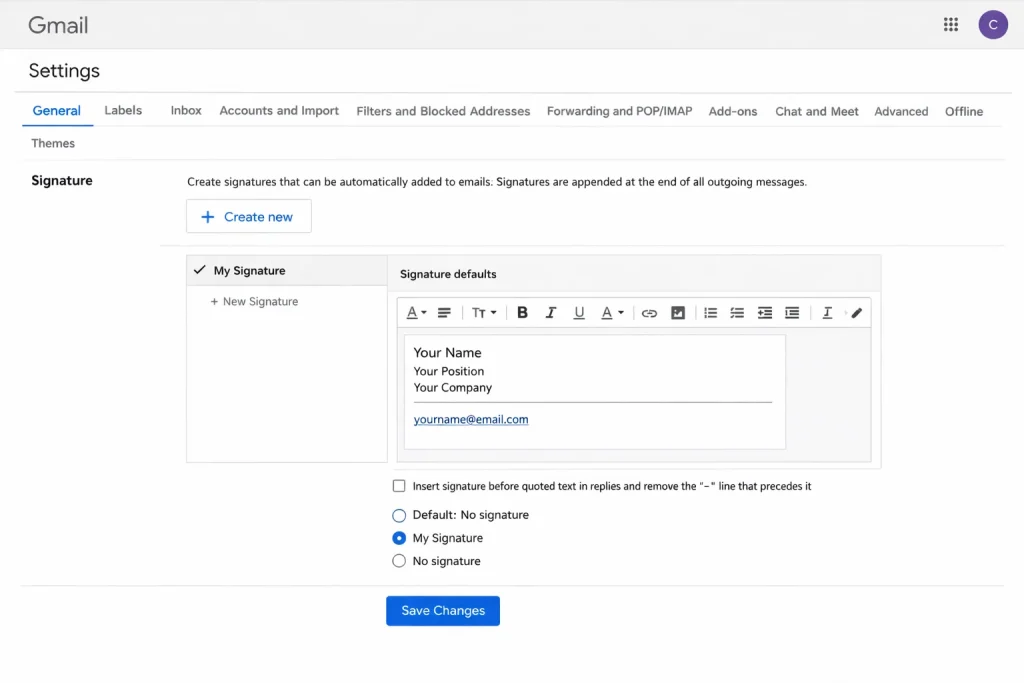
Once inside settings:
- Make sure you are on the “General” tab.
- Scroll down until you see the “Signature” section.
- Click “Create new” if you want a new signature.
- Or select your existing signature to edit it.
This is where you can easily update your signature in Gmail whenever needed.
Step 3: Edit or Create Your Signature
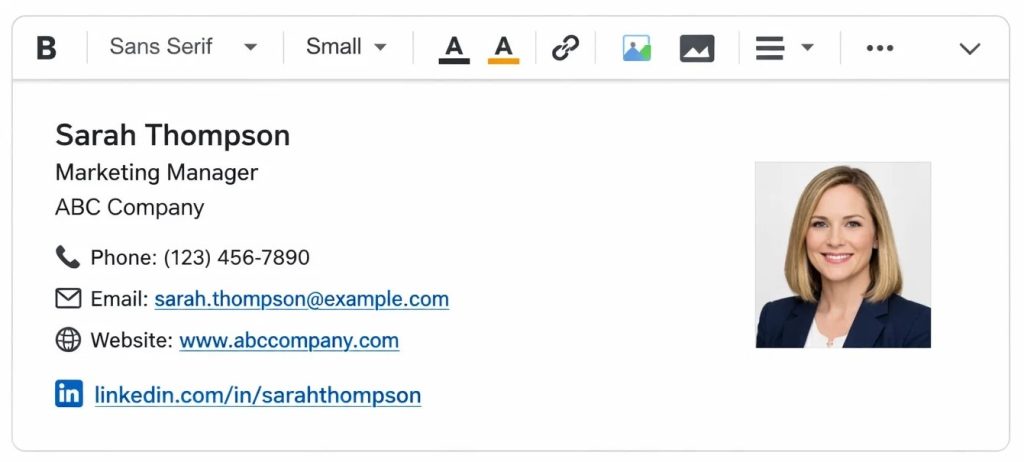
Inside the editor box, you can type and format your signature. Gmail provides simple tools that let you:
- Bold text
- Change font size
- Adjust text color
- Align text
- Insert links
- Add images
Start with the basics:
- Your full name
- Your job title
- Your company name
- Your phone number
- Your website (if relevant)
Keep your signature short and clean. Four to six lines work best. When you Change Gmail signature, focus on clarity rather than decoration.
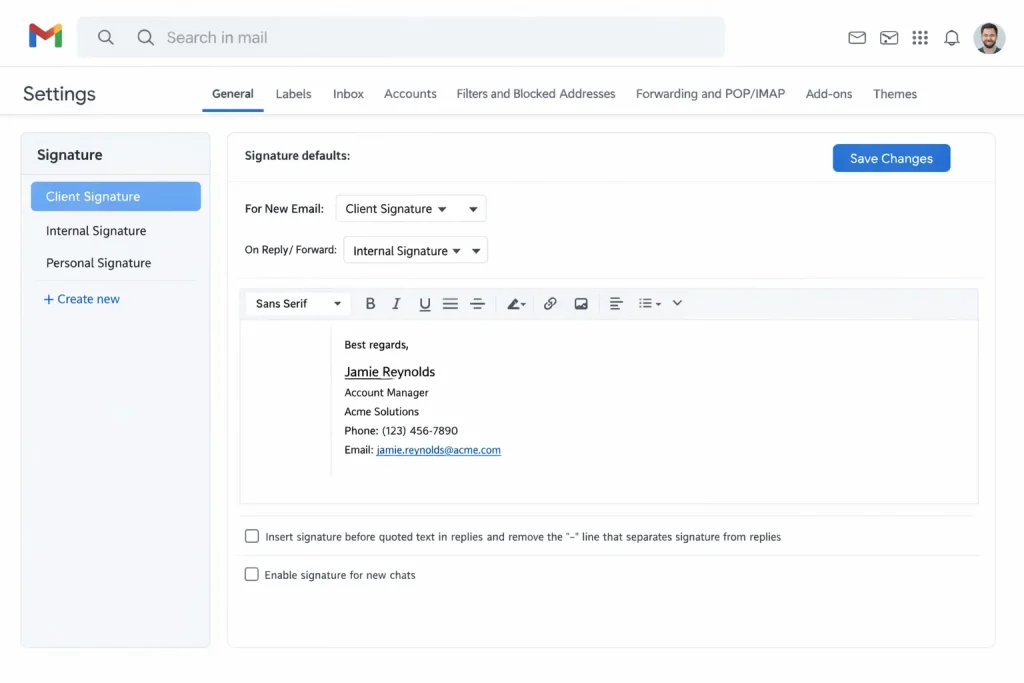
Step 4: Set Default Signature Options
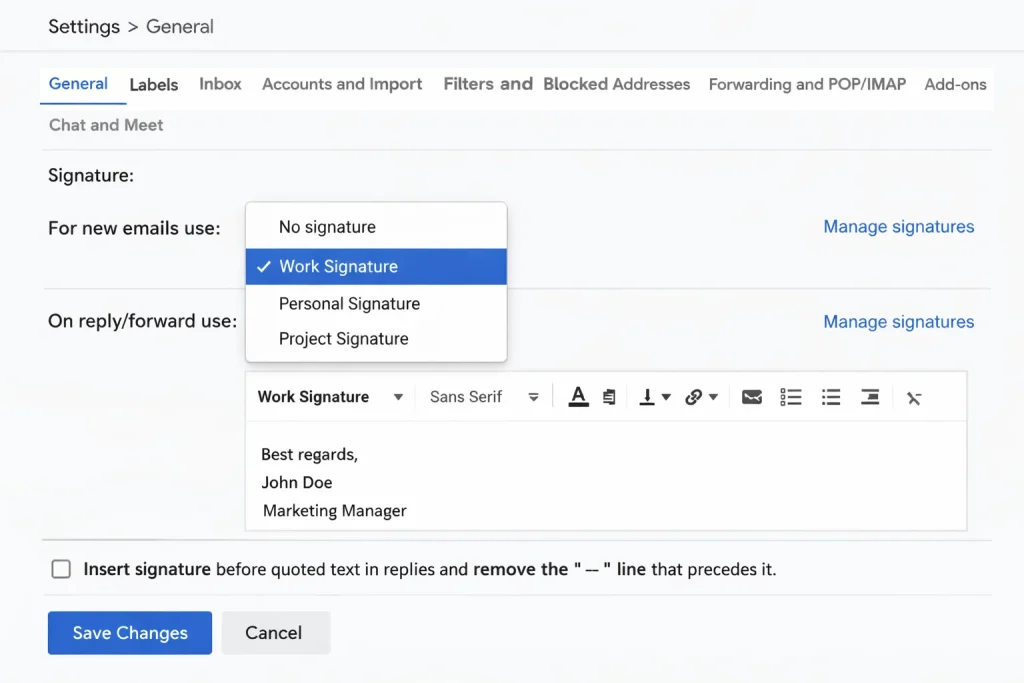
Below the editor, Gmail lets you set default signatures.
You can choose:
- Which signature appears in new emails
- Which signature appears in replies and forwards
This feature helps if you want a longer signature for new messages and a shorter one for replies. It keeps conversations tidy and professional.
Step 5: Save and Test
After making changes:
- Scroll to the bottom of the page.
- Click “Save Changes.”
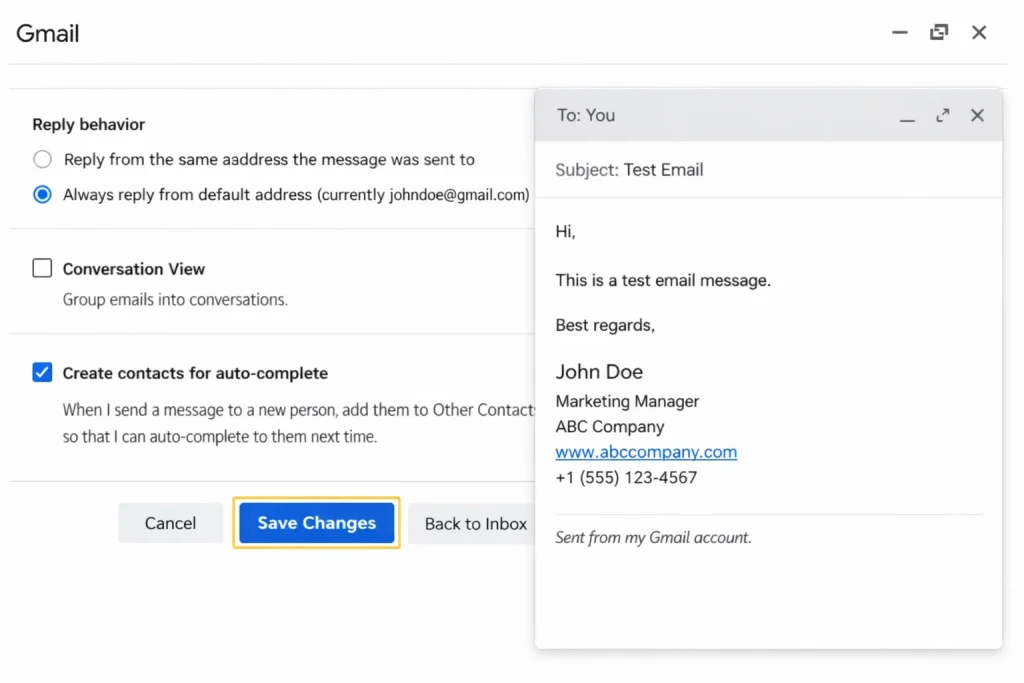
- Compose a test email to yourself.
Check that your formatting looks correct. Click every link. Make sure images load properly.
Testing prevents embarrassing mistakes later.
How to Change Email Signature Gmail on Mobile? 📱
Many people send emails from their phones. Gmail allows mobile signatures, but they work slightly differently.
Mobile signatures are usually plain text. They do not support logos or advanced formatting.
On iPhone (iOS)
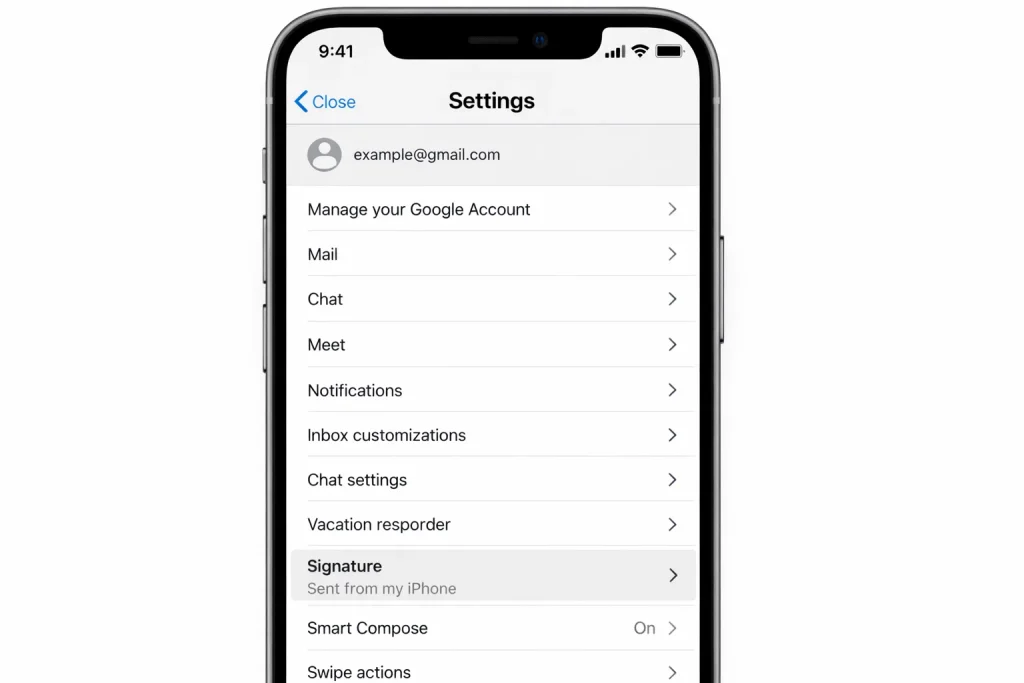
- Open the Gmail app.
- Tap the three horizontal lines in the top corner.
- Tap “Settings.”
- Select your email account.
- Tap “Signature settings.”
- Enter your desired signature text.
- Tap “OK.”
On Android
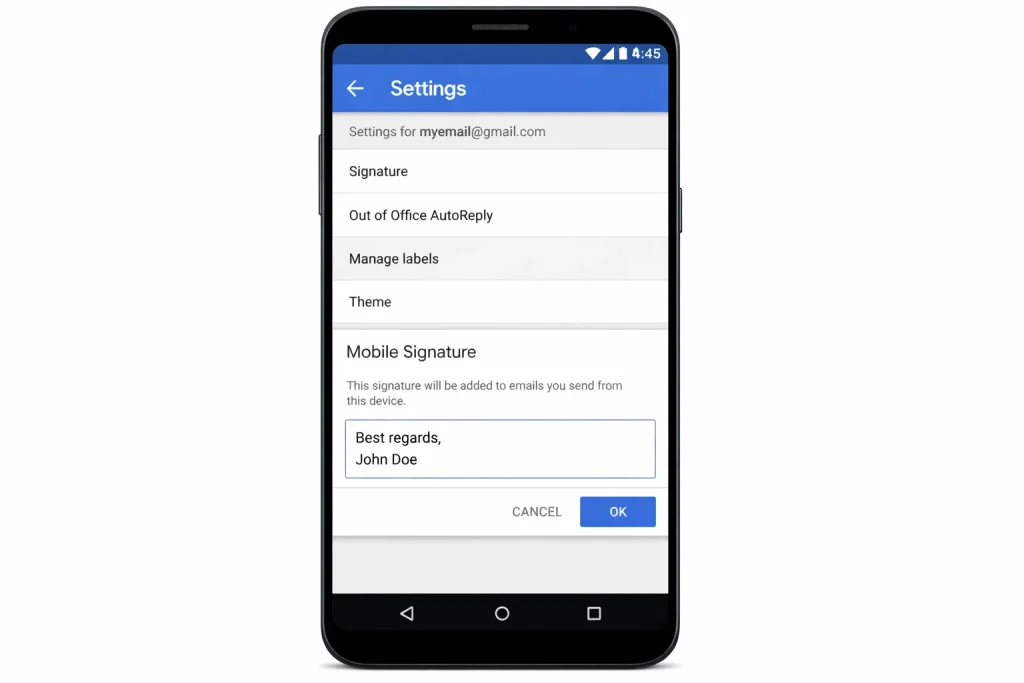
- Open the Gmail app.
- Tap the menu icon.
- Tap “Settings.”
- Choose your account.
- Tap “Mobile Signature.”
- Enter your signature.
- Tap “Save.”
Remember, desktop and mobile signatures are separate. If you want consistency, make sure you update both versions.
What Should You Include When You Update Your Signature in Gmail?
When you update your signature in Gmail, think about usefulness. Do not add unnecessary information.
Here is what most professionals include:
- Full Name
- Job Title
- Company Name
- Phone Number
- Website
Optional elements:
- LinkedIn profile
- Small company logo
- Legal disclaimer (if required by your industry)
Avoid clutter. A signature should be helpful, not overwhelming.
Smart Formatting Tips for a Clean Gmail Signature

Now that you know how to change your signature in Gmail, let’s improve its appearance.
Keep It Short and Focused
Long signatures make email threads messy. Keep it compact.
Use Simple Fonts
Stick to standard fonts. Fancy fonts may not display properly on different devices.
Limit Colors
Use no more than 1 or 2 brand colors. Too many colors look unprofessional.
Keep Images Small
If you insert a logo, compress it. Large images slow down emails and may trigger spam filters.
Make Links Clickable
Highlight text like your website and insert a proper hyperlink. This looks cleaner than pasting long URLs.
Common Mistakes to Avoid When You Change Your Gmail Signature
Even though Gmail makes editing easy, many people make simple mistakes.
Adding Inspirational Quotes
Quotes often distract from your contact details. Keep the focus on professional information.
Using Large Banners
Large banners make your emails load more slowly.
Overloading Social Media Links
Include one or two professional profiles at most. Too many icons create visual clutter.
Forgetting to Update Information
Changed roles or phone numbers? Update immediately. Outdated information damages credibility.
Using Multiple Signatures in 2026
Gmail allows multiple signatures. This feature is extremely helpful if you:
- Manage more than one email account
- Work in multiple roles
- Send formal and informal emails
You can create a professional signature for clients and a shorter version for internal communication.
This flexibility gives you control and keeps communication organized.
Why a Strong Signature Builds Instant Trust?
People judge emails quickly. When they scroll to the bottom and see:
- A clear name
- A defined job title
- Direct contact details
They feel confident about who you are.
Your signature acts like a digital business card. It shows you take communication seriously. It also reduces back-and-forth messages because recipients already have your contact information.
Make Every Email Work for You
Learning how to change the email signature on Gmail settings only takes a few minutes. But those few minutes improve every message you send.
If you send just 10 emails a day, that is 300 emails a month carrying your signature. That means hundreds of impressions.
Your signature quietly markets you. It reinforces your identity. It saves time. It strengthens credibility. Make sure your signature is clean, up to date, and professional.
Conclusion
Your Gmail signature may seem small, but it plays a powerful role in how people see you. Every email you send carries your name, your role, and your brand. A clean and professional signature builds trust and credibility with each message.
The good news is that updating it takes only a few minutes. Once you understand how to change your signature in Gmail, you gain full control over how you appear in every inbox. A simple update can make your emails clearer, more organized, and more effective.
Frequently Asked Questions
Open Gmail on your computer, click the gear icon in the top-right corner, and choose “See all settings.” Scroll down to the Signature section under the General tab. Create a new signature or edit your existing one. After making changes, scroll down and click “Save Changes.”
The easiest way is through desktop Gmail. Go to Settings, scroll to the Signature section, edit your details directly in the editor box, and save. Always send yourself a quick test email to confirm everything looks correct.
On a desktop, open Gmail in your browser. Click the gear icon, select “See all settings,” and stay in the General tab. Scroll to Signature, edit or create your signature, assign it as default if needed, then click “Save Changes.”
Yes. Open the Gmail app, tap the menu icon, go to Settings, select your account, and tap “Mobile Signature” or “Signature settings.” Enter your signature text and save. Keep in mind that mobile signatures typically support only plain text.
Keep it short and clear. Include your full name, job title, company name, and phone number. Use simple fonts, minimal color palettes, and small images as needed. Avoid long quotes or too many social media links. Clean formatting always looks more professional.
1. Open Gmail Settings.
2. Scroll to the Signature section.
3. Edit or create your signature.
4. Assign it as the default if needed.
5. Save changes and test it.
Following these five steps usually takes less than five minutes.
If you manage multiple Gmail accounts, switch to the account you want to edit first. Then go to Settings and update the signature for that specific account. Gmail allows you to assign different signatures to each account and even set separate defaults for replies.
Yes. In Gmail on desktop, you can insert images, such as logos, and add clickable links to websites or LinkedIn profiles. Use the formatting toolbar inside the signature editor to insert links and images. Always keep image sizes small for best performance.
In the Signature section of Settings, use the dropdown menus to assign a signature for new emails and for replies or forwards. Once selected, scroll down and click “Save Changes.” Gmail will automatically insert the chosen signature into future emails.
First, make sure you clicked “Save Changes” at the bottom of the settings page. If the issue continues, refresh the browser, clear your cache, or try using a different browser. Also, check that no browser extensions are interfering with Gmail settings.